Red White and Blue Pudding Pops
This post may contain affiliate links. Read our disclosure policy.
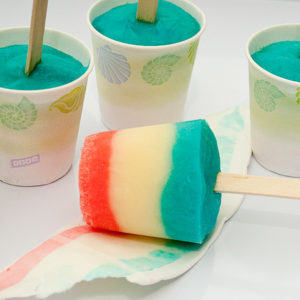
Today’s recipe is delightfully simple and guaranteed to help you cool off in the most patriotic way—Red, White & Blue Pudding Pops! With just three basic ingredients—milk, instant pudding mix, and food coloring—you can whip up a batch of creamy, colorful pops that are perfect for celebrating patriotic holidays like Memorial Day or the 4th of July. Or enjoy them on any sunny summer afternoon.
When it comes to forming your Jell-O pudding pops, you’ve got options! If you own a popsicle mold, feel free to use it for a more professional finish. I opted for small Dixie paper cups and popsicle sticks, which are easy to find and disposable, perfect for parties or quick cleanup. And if popsicle sticks aren’t available, don’t worry! Sucker sticks or even plastic spoons make great substitutes in a pinch. No matter how you mold them, these pops are a festive treat that’s as fun for kids to make as it is to eat.

Ingredients for Red, White, and Blue Pudding Pops
- WHITE CHOCOLATE INSTANT PUDDING MIX
- MILK (I USED SKIM)
- RED FOOD COLORING
- BLUE FOOD COLORING (I USED NEON)
- POPSICLE STICKS
Instructions for Red, White, and Blue Pudding Pops
Prepare the Pudding Base – In a large bowl, combine the instant white chocolate pudding mix and cold milk for 2 minutes, until smooth and slightly thickened.
Color Pudding
- Scoop ⅔ cup of pudding into a small bowl and stir in red food coloring until you reach your desired shade.
- Scoop another ⅔ cup into a second bowl and add blue food coloring to create a vibrant blue layer.
- Leave the remaining pudding uncolored for the white layer.
Layer the Pudding in Cups – Divide the red pudding evenly among 6 clear plastic cups (9 oz. size works well). You can pour or pipe the pudding mixture—just be gentle, as it’s still a bit runny. Tap each cup lightly on the counter to level the layer.
Repeat the process with the white pudding, spooning it gently over the red layer. Then finish with the blue pudding on top, tapping again to smooth the surface.
Freeze & Insert Sticks – Place the filled cups on a cookie sheet or freezer-safe tray and freeze for 30 minutes. Once slightly firm, carefully insert a popsicle stick into the center of each cup, pushing it about ¾ of the way down.
Return the pops to the freezer and chill for at least 2½ hours, or until fully frozen.
Unmold & Serve – When ready to serve, cut a small slit in the side of each cup to help release the pop. Peel away the cup, and enjoy your creamy, colorful patriotic treats!
Frequently Asked Questions
Can I use homemade pudding instead of instant mix?
Yes! Just make sure it’s thick enough to layer and freeze well. Instant pudding is quicker, but homemade adds a rich, custardy flavor.
How do I keep the layers from mixing together?
Let each colored layer settle briefly before adding the next, and pour gently—using a spoon to diffuse the flow helps prevent color bleeding.
Can I use gel food coloring instead of liquid?
Absolutely. Gel food coloring works well and gives vibrant color without thinning the pudding.
How long do pudding pops need to freeze?
Freeze for 30 minutes before inserting sticks, then at least 2½ hours more to fully set. Overnight freezing works great too!
Can I make these pops ahead of time?
Yes! They can be made up to 3 days in advance and stored in the freezer until ready to serve.
How do I remove the pops from the cups?
Cut a small slit in the side of each cup and peel it away. You can also run the cup under warm water for a few seconds to loosen the pop.
Can I add mix-ins like sprinkles or fruit?
Definitely! Just keep them small so they don’t interfere with layering or freezing. Sprinkles between layers add a fun touch.
FOR MORE RECIPES LIKE THIS, TRY:
Red, White ,and Blue Pudding Pops
Real Mom Kitchen
Equipment

Ingredients
- 3.3 oz pkg white chocolate instant pudding mix
- 2 cups milk I used skim
- red food coloring
- blue food coloring I used neon
- 6 popsicle sticks
Instructions
- In a medium bowl, combine the milk and pudding mix. Beat together for two minutes.
- Place 2/3 cup of the pudding in a bowl and add some red food coloring, just enough to get the red color you want.
- Now place another 2/3 cup of pudding in another bowl and add enough blue food coloring to get the color of blue that you want.
- Divide the red pudding evenly between the 6 cups, this can be done by pouring or piping. Both work well. The pudding is still a little runny at this time so be careful if you pipe it in the cups. After the red pudding is in the cups, give them all a tap to help even them out.
- Now repeat step with the white pudding, that was not colored. Then repeat that same step with the blue pudding.
- Place the pudding pops on a cookie sheet or other freezer safe dish and place in the freezer. Freeze for 30 minutes.
- Remove the pops from the freezer and carefully insert the popsicle sticks into the center of each pop about 3/4 of the way into the pudding. Place popsicles back in the freezer for at least 2 1/2 hours or longer. When ready to serve, cut a little slit into each cup. this makes it easier to remove the cup. Tear off the cups and enjoy. Makes 6 pops.
Nutrition
Recipe is a Real Mom Kitchen Original, but was inspired by a recipe on Endless Summer.