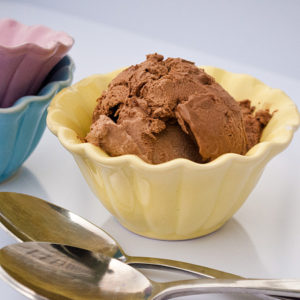
Magic Chocolate Ice Cream
This post may contain affiliate links. Read our disclosure policy.
If you’ve ever wished for homemade chocolate ice cream without the hassle of an ice cream maker, today’s recipe is pure magic—and I mean that literally! With just five simple ingredients and a hand or stand mixer, you can whip up a batch of rich, velvety magic chocolate ice cream that’s as indulgent as it is effortless. The secret lies in whipping the cream to soft peaks and gently folding it into a silky chocolate mixture made with melted bittersweet chocolate and sweetened condensed milk.
This frozen treat was an instant hit in our household—decadent, creamy, and deeply chocolatey, with a texture that’s somewhere between a mousse and a truffle. It melts in your mouth like a dream and delivers that luxurious chocolate flavor in every bite. Trust me, this is one recipe you’ll want to keep on repeat all summer long—it’s a must-try for any chocolate lover!

Ingredients for Magic Chocolate Ice Cream
- SWEETENED CONDENSED MILK
- VANILLA EXTRACT
- SALT
- BITTERSWEET CHOCOLATE, CHOPPED (I USED NESTLE CHOCOLATIER FOUND ON THE BAKING ISLE)
- HEAVY CREAM
Ingredients for Magic Chocolate Ice Cream
Melt the Chocolate Base – In a microwave-safe bowl, combine the bittersweet chocolate and sweetened condensed milk. Microwave chocolate in 10-second intervals, stirring between each, until the chocolate is melted and the mixture is smooth and glossy. Be patient—short bursts help prevent scorching. Once melted, stir in vanilla extract and salt.
Let the chocolate mixture cool to room temperature before combining with the whipped cream.
Whip the Cream – In a large mixing bowl (or stand mixer), whip the heavy cream. Beat with an electric mixer until soft peaks form—light and fluffy, but not stiff.
Fold It All Together – Start by gently stirring ⅓ of the whipped cream into the cooled chocolate mixture to lighten it. Then, add the chocolate mixture to the remaining ⅔ of the whipped cream and fold gently until fully combined. This step takes a little time—be patient and keep folding until no white streaks remain. It’s a mini arm workout, but totally worth it!
Freeze & Serve – Transfer the mixture to an airtight container and freeze for at least 6 hours, or until firm. When ready to serve, let it sit at room temperature for a few minutes to soften slightly for easier scooping.

Frequently Asked Questions
Can I use milk chocolate instead of bittersweet?
Yes! Milk chocolate will make the ice cream sweeter and creamier, while bittersweet chocolate gives it a deeper, more intense flavor. Choose based on your taste preference.
How long does it take to freeze?
Freeze for at least 6 hours, or overnight for best results. The ice cream should be firm but scoopable—let it sit at room temperature for a few minutes if it’s too hard.
Can I add mix-ins like chocolate chips or nuts?
Absolutely! Stir in mini chocolate chips, chopped nuts, or swirls of chocolate sauce, caramel, or peanut butter after folding in the whipped cream. Just keep mix-ins to about ½ cup total.
How long will it keep in the freezer?
Stored in an airtight container, it will stay fresh for up to 2 weeks. After that, it may start to develop ice crystals or lose its creamy texture.
What’s the texture like compared to churned ice cream?
It’s incredibly creamy—more like a frozen chocolate mousse or truffle than traditional churned ice cream. No icy bits, just smooth, rich chocolate goodness.
Can I double the recipe?
Yes! Just make sure your mixing bowl is large enough to handle the volume, and divide the mixture between two containers for freezing.
FOR MORE RECIPES LIKE THIS, TRY:
- S’mores Ice Cream
- Strawberry Sour Cream Ice Cream
- Dulce de Leche Ice Cream
- Basic Homemade Ice Cream (No Churn)
Magic Chocolate Ice Cream
Real Mom Kitchen
Equipment


Ingredients
- ½ cup sweetened condensed milk
- 1 tsp vanilla extract
- 1 pinch salt
- 4 oz bittersweet chocolate chopped (I used Nestle Chocolatier found on the baking isle)
- 1 ⅓ cups heavy whipping cream
Instructions
- Place the chocolate and the sweetened condensed milkin a microwave safe bowl. Microwave on high for 10 second intervals and stir between each until combined and smooth.
- Add the vanilla and salt,to the chocolate mixture and stir. Allow mixture to cool to about room temperature.
- In a large mixing bowl, whip the cream to soft peaks. I did this in my kitchen aid. By the time the cream is whipped, hopefully the chocolate mixture is cooled enough.
- Now add in 1/3 of the whipped cream to the chocolate mixture and carefully stir it together. Now add the chocolate mixture to the remaining 2/3 of the whipped cream and gently fold it in. This does take some time. You don’t want any white bits in the ice cream. Just be patient. It will give you arm a little work out, but that’s ok. This ice cream is worth it.
- Place the mixture into an airtight container and freeze for at least 6 hours. You may need to let it sit on the counter just a bit before you scoop it.
Nutrition
Recipe adapted from The Craftinomicon, which adapted it from Cook’s Country.