Fail Proof Roast and Gravy
This post may contain affiliate links. Read our disclosure policy.
Today, I’m thrilled to share a recipe that has become a true weeknight (or, indeed, Sunday!) favorite in my kitchen. It’s a practically fail-proof beef roast that magically creates its own delectable gravy as it cooks. This isn’t one of those complicated, multi-step recipes. This is wonderfully simple, relying on just a handful of pantry staples to deliver incredibly tender and flavorful results.
If you’re looking for a comforting and satisfying meal without a lot of hands-on time, you’ve come to the right place. The inspiration for this gem comes courtesy of the fantastic community over at Tasty Kitchen, where the user “hogfeeder” generously shared their wisdom. And honestly, sometimes the simplest recipes are the most brilliant, requiring little more than a few key ingredients and the patient heat of your oven.

There aren’t a lot of bells and whistles here, just honest-to-goodness deliciousness. Trust me, the aroma that fills your kitchen as this roasts is simply divine, promising a hearty and satisfying meal that’s perfect for gathering around the table. This truly embodies the essence of a classic Sunday dinner, made easy enough for any day of the week.
Ingredients for Fail Proof Roast and Gravy
- BEEF OR PORK ROAST
- CREAM OF MUSHROOM SOUP
- CREAM OF CELERY SOUP
- BROWN GRAVY MIX
- WATER
Instructions for Fail Proof Roast and Gravy
Preheat and Prep: Get your oven warming up to 350°F (175°C). Grab a heavy, oven-safe pot with a lid that’s large enough to comfortably hold your roast. I like to use my Dutch oven. Place the roast inside the pot.
Add Liquid and Season: Pour about 1 cup of water into the pot – you want it to come roughly halfway up the side of the roast. Now, season the top of the roast generously with salt and pepper. Remember to be mindful of the salt content in the gravy mix, so don’t overdo it here.
The Magic Gravy Mixture: In a small bowl, combine the condensed cream of mushroom soup, the condensed cream of onion soup, and the packet of brown gravy mix. Stir everything together until it’s well combined. Pour the soup and gravy mixture evenly over the top of the roast. Make sure the entire roast is nicely covered with this flavorful concoction.
Slow and Steady Wins the Race: Cover the pot tightly with its lid and place it in the preheated oven. Set a timer for 2 hours to start.
The Tenderness Test: After the initial 2 hours, it’s time to check for doneness. The roast is ready when you can easily pierce it with a fork – it should be wonderfully fork-tender. If it needs more time, continue cooking, checking it every 15-30 minutes until it reaches that perfect tenderness. Remember, the cooking time will vary depending on the size and cut of your roast.
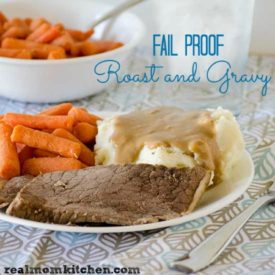
Serve and Enjoy: Once your roast is beautifully tender and the gravy is rich and flavorful, it’s time to serve! This roast and gravy is absolutely divine to serve over a bed of creamy mashed potatoes – the perfect comfort food combination.
Frequently Asked Questions
What kind of roast can I use?
You can use various cuts such as beef chuck roast, round roast, brisket, or even pork loin roast. Keep in mind that tougher cuts benefit from the longer, slower cooking process, becoming wonderfully tender. The size of your roast will affect the cooking time too.
Do I need to sear the roast first?
Nope! This recipe is all about simplicity. There’s no need for searing beforehand. It goes straight into the pot with the other ingredients.
Can I add veggies to the pot?
Absolutely! You can add vegetables like carrots, potatoes (cut into large chunks), and onions to the pot along with the roast. Place them around the roast, ensuring they are partially submerged in the liquid. Be aware that they will absorb some of the gravy flavor and will become very tender. Adjust cooking time as needed.
Can I use different kinds of condensed soup?
While the recipe calls for cream of mushroom and cream of celery, you can experiment with other condensed soups for a slightly different flavor profile.
How do I know when the roast is done?
Gently try to pierce the roast with a fork. If it slides in easily without much resistance, it’s likely done. If it still feels tough, continue cooking and check again every 15-30 minutes. To be more precise, a meat thermometer inserted into the thickest part of the roast should register around 190-205°F (88-96°C) for well-done results.
Gravy
I don’t have brown gravy mix. Can I substitute something else?
The brown gravy mix adds flavor and helps thicken the gravy. If you don’t have it on hand, you could try adding a tablespoon or two of beef bouillon powder or granules for extra flavor. However, the gravy might not be as thick. You could potentially thicken it at the end by whisking in a slurry of cornstarch and cold water (about 1 tablespoon of each) into the simmering liquid until it reaches your desired consistency.
The gravy seems thin. How can I thicken it?
Place the pot on the stovetop over medium heat. In a small bowl, whisk together 1-2 tablespoons of cornstarch with an equal amount of cold water to create a slurry. Slowly whisk the slurry into the simmering gravy until it thickens to your desired consistency. Simmer for a few minutes, stirring constantly.
FOR MORE RECIPES LIKE THIS, TRY:
Fail Proof Roast and Gravy
Real Mom Kitchen
Equipment


Ingredients
- 2 pounds beef or pork roast
- 10 ¾ oz can cream of mushroom soup
- 10 ¾ ox can cream of celery Soup
- 1 oz pkg brown gravy mix
- water
Instructions
- Preheat oven to 350 degrees.
- Place roast in a heavy, oven-safe pot with a lid. You can use any size or type of roast. The only thing that changes is the cooking time.
- After the roast is in the pot, add just a bit of water (should come about 1/2 inch up the side of the pot, I used about 1 cup). Then, salt and pepper the roast. Go easy on the salt because of the salt in the gravy mix.
- In a small bowl, combine the two soups and the packet of gravy mix. (You can use low-fat soups or reduced-sodium gravy mix as well.)
- After the soups and gravy are combined, pour the mixture over the top of the roast. Make sure the roast is completely covered with the mixture.
- Cover with a lid, and place in the oven for 2 hours to start. The roast should be fork tender when done so if you need to cook it longer, do it. The key is that it’s done when it’s fork tender so keep checking it once you pass the 2 hour point. Serve with mashed potatoes.